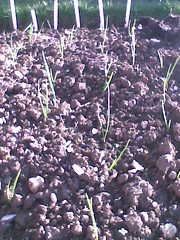
One of the few things that properly grows over winter.
Planted these onion sets at the beginning of October, and now they're clearly showing through the ground.
Saturday, 22 November 2008
Onions
Saturday, 15 November 2008

Wednesday, 12 November 2008
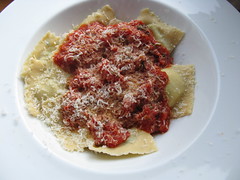
Tagliatelle Carbonara
I cooked a Taliatelle Carbonara over the weekend as we were entertaining some friends. Here's the recipe and my thoughts on making a good Carbonara.
Ingredients (serves 2):
- Home Made Fresh Tagliatelle (a recipe for another day)
- 1 small pot single cream (I think they're around 300ml from memory)
- A handful of Italian hard cheese, grated (Parmesan or similar)
- 4 rashers smoked back bacon, fat removed and diced
- 1 egg
- Ground black pepper
- Herbage (I used Tarragon or Basil, depending on what I have/like at the time)
It's worth remembering Carbonara is a creamy sauce not a cheesy sauce so use enough cheese to give a good flavour but not overpower the whole dish. This would very much depend on the cheese you get and particularly if you switch away from Italian cheese. I like to use single cream where most Carbonara recipes used double, for me I prefer the reduced fat content and find that double cream can make the sauce too thick. The last thing to say about the ingredients is about the Bacon, use the best quality you can get. I prefer to go for the added flavour of a smoked variety from my butcher but you could equally use green bacon, if you go with cheaper cuts from the supermarket you may need to add more (their rashers are much smaller). Again, I use back bacon to help with overall fat content and remove most of the fat before cooking.
Method:
If you're using dried pasta you might want to start that off first. For home made, make the Tagliatelle before you start.
Make the carbonara sauce before you start to cook. Put the egg into a bowl and whisk lightly just to mix. Add the cream to the egg and stir together. Add lots of black pepper and the cheese, and have a final stir to complete the sauce.
Heat some oil in a pan and fry the bacon, you can cook longer for crispier bacon or shorter as you prefer. Add your herbage at some point while cooking the bacon as you prefer. Most recipes will have you add the bacon to the Carbonara sauce and use the heat of the cooked pasta to heat the sauce and cook the egg. Personally, I prefer to remove the bacon pan from the heat and add the carbonara to the bacon in the pan, this should better ensure the egg gets cooked and results in a hotter meal...
If you're working with fresh pasta, start that off about now. Remove the bacon from the heat and allow to cool slightly before adding the Carbonara sauce to the pan. Return on a very low heat to warm the sauce, this should help the egg thicken the single cream too. Be careful not to boil the mix, if you do boil you risk the sauce being way too thick and possibly lumpy. It's better to leave the sauce slightly less thick than you would ideally want as it will thicken even more when it hits the hot pasta!
Meanwhile your pasta should have been cooking, so drain it and return to the pan it was cooked in. Pour half the Carbonara onto the pasta and stir. Serve the pasta mix into your pasta bowls. Pour the remaining Carbonara over the top. You can garnish with more black pepper, grated cheese or herbage as you like.
Serve with a dressed green salad and/or garlic bread. Yummy, enjoy!!!
Sunday, 12 October 2008
Poo

Here's Graham and Colin loading some of the wheel barrows. 20 of them have gone onto our plot.
10 tonnes of manure arrived at the allotment. We spent the morning working with about 5 others moving 120 barrow-loads to various allotment plots.
Thursday, 9 October 2008
Squash and Spinach Cannelloni
First up, sorry for the lack of picture on this one, but we were hungry. Ok, so actually we forgot to get the camera out after I'd cooked and concentrated on filling our faces instead.
We have been getting quite a few squash from the allotment recently and my usual response to is to throw them in a veggie risotto. Bored with that idea, I decided to come up with something entirely new and did a bit of a make it up as you go along thing to get there. Here's the idea...
Ingredients:
- 1 Squash (from the allotment)
- A couple of handfuls of Spinach (from the allotment)
- A handful of grated parmesan (our is local from West Sussex)
- A couple of knobs of butter
- Garlic (from the allotment)
- A home made sheet of fresh pasta
- Large tin of chopped tomatoes
- Red wine vinegar
- Fresh basil
- Salt and pepper
Method:
As if you're making mashed potato, boil the squash for 15 minutes or so in water.
Make a tomato sauce by heating the chopped tomatoes with chopped basil stirred in. Add salt, pepper and a dash of red wine vinegar to taste. Reduce this mixture down until you have a rich tomato sauce.
In the mean time, heat some oil and melt a knob of butter in a frying pan. Add the garlic to the pan and start to cook. Wilt the spinach in the pan. When done, chop the spinach.
Mash the squash with a knob of butter, adding salt+pepper to taste. Whip in the parmesan while still hot then stir in the spinach. This forms the filling for the cannelloni.
Roll out your pasta sheet (or use fresh lasagne sheets if you can get them, or even dried ready made cannelloni if you must). Place a good line of the filling across the width of the pasta sheet, say a heaped desert spoonful, depending on how wide the pasta is. Roll the end around the filling so you end up with cannelloni the size of a decent sausage. Cut that one off the sheet and repeat until you've run out of filling (or pasta).
Pour a little of the tomato mixture into a lasagne type dish. Then add all of the cannelloni tubes on top. Pour over the remaining tomato mixture. You can now add anything else you want to the topping, such as more basil, cheese, or maybe use a mix of white and tomato sauce. When assembled, put into the oven on about 200c, gas mark 5, for around 15-20 minutes.
When done, serve with garlic bread and or a simple green salad. Lovely!
Saturday, 27 September 2008
Blackberry and Apple Jam
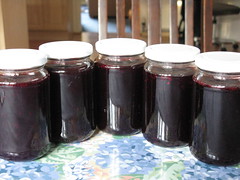
As we get a lot of blackberries from the allotment, I decided to make some jam.
I used the recipe from here: www.cottagesmallholder.com/?p=430
Took quite a while to make, so glad that I doubled up on the quantities, as I only made 5 jars!
Sunday, 14 September 2008
A typical days picking

Squash, cabbage, courgette, beetroot, blackberries, broad beans, green beans, peas, runner beans
Taken a couple of weeks ago, but shows the variety of crop that we're getting
Sunday, 20 July 2008
Spuddy wuddies
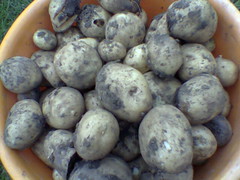
G spent much of Saturday afternoon digging up potatoes. 14.6kg worth (we weighed them on the bathroom scales)
These are 'Rocket' new potatoes, and some of them are absolutely massive. Most are now in storage in the garage.
Garlic

First garlic harvest. Am well chuffed at growing garlic - a first for me. Ignore that Skate said it is dead easy.
It was quite simple really I guess, break up a clover of garlic (these are from the Isle of Wight Garlic Company), and then plant, each clove about 6 inches apart. Did this in September, then wait until Mid Summer's day and harvest.
I liked the fact that they were due to be picked on mid-summer's day - reminds that you are reliant on nature for these things.
Sunday, 29 June 2008
the first onion of the year
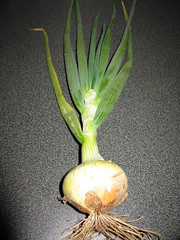
our first onion of the year.
the plot is beginning to start producing sensible amounts of produce. Which is good, there are points (two failed carrot sowing sessions), where you wonder whether you're going to get anything out of it.
I'm pleased to report that this past week has been a turning point, and now the majority of our veg is home-grown. We've had broad beans, peas, onion, garlic, potatoes, lettuce, rocket and radish. Have also picked the last of this year's rhubarb, but have to admit that we froze that rather than ate it.
B
Tuesday, 10 June 2008
New Brassica Netting

After my recent pictures showing our cabbages looking rather sorry for themselves, this is my solution to the problem. The netting is a lot more substantial and hopefully pigeon proof than the last lot.
Sunday, 8 June 2008
Broad Beans

Not a total failure, but not the biggest bean plants either. I'm sure we'll learn from these and do even better next year, but they are producing some nice looking pods now.
Onions

I'm reliably informed these are the mixed over winter onions nearing readiness for summer consumption. They're pretty much ready to go now in fact so it'll just be a case of harvesting and drying them properly for storage. Although, these don't keep as long as the later variety.
A mixture of red and white.
Potatoes

Here's where we're at with the spuds now!
They're coming on quite nicely, first time we've grown them though so we don't really know what we're doing.
Cabbage

Bloody pigeons is all I can say!!! I spent last weekend hunting down some more robust netting. The pigeons have taken to landing on top of it, flattening it to the ground and munching on whatever they've landed on the little buggers!
Thursday, 22 May 2008
Asparagus
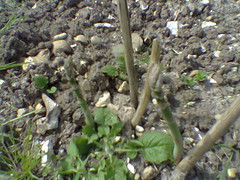
Apologies for the weeds, they've gone now!
This is our exciting new crop, but think we're going to have to wait until next year before we can pick any.
Counted 7 stems of asparagus tonight - so I don't think we're going to be making much of a surplus!
Monday, 5 May 2008
Purple Broccoli

Since we were digging out the broccoli today it would have been rude not to get the remaining heads from it.
Brassica Bed

Last years brassicas were grown in this bed, we're digging it over and finishing off the digging out today. This year it will have beans, cucumbers and courgette in.
Finally finished digging out the grass.

The enormous pile on the left is what's taken a year to dig out of our plot so today was quite a milestone as it's maintenance from here forwards rather than digging out from scratch. Phew!
Peas

Our peas last year were destroyed by pigeons, we've learned from the mistake and put netting around them this year. These are the first of two lots to go in, 12 plants in all here.

Wednesday, 16 April 2008
Herb Garden

Last weekend we went to a local garden centre we've not been to before, primarily to check it out, but also because we get a discount there (for our allotment association membership) that we don't get at our usual one.
We were stocking up for the first pass at our herb garden, we're growing this at home rather than the allotment for the convenience of picking while cooking. So far, we have spinach, purple sage, thyme, parsley, chives, rosemary, and some strawberries thrown in there for good measure too.
The beginnings of our herb garden at home.
Sunday, 13 April 2008
Spring Is Here

Recording where we're at on 13th April 2008. It's spring, not a lot is happening at the allotment just yet for us, still readying the ground. At home, however, things are different as the greenhouse is full of little seedlings!
Monday, 7 April 2008
Spinach and Ricotta ravioli
Home grown spinach (which had to be cleared of snow to harvest!)
Made a batch of fresh pasta
Wilted some spinach with garlic butter, chopped and stirred into some ricotta.
Used the moulds to make the ravioli and cooked for a couple of minutes.
Added a tomato and basil sauce to the top and garnished with some grated parmesan
Sunday, 6 April 2008
Italian Torte

This is "La Torta Della Giovane Sara", or "Young Sara's Torte" from Jamie Oliver's Jamie's Italy book, page 300.
I'm trying it out as a possible desert for an Italian meal we'll be cooking some friends in a couple of weekends time.
Saturday, 29 March 2008
Spuds going in 29th March 2008

They've been ready (chitted) for a couple of weeks now, and the trench dug, just had to wait for it to get a bit warmer (and drier, but I gave up on that!)
Tuesday, 19 February 2008
Seed Potatoes

It might not look like much at the moment, but we have a couple of boxes of these little guys on the go at home at the moment. We've had our seed potatoes for around a month or so now I guess and they're starting to shoot very nicely.
They're destined for our potato plot we spent so much time on and worked so hard to create at the end of last year. I'm really pleased we put the effort in to get that bit finished off last year as I don't much fancy doing all that digging in the weather we've got at the moment. That said, I'm assured it's still going to be a lot of work to dig them in, and even more to dig them back out again when they're fully grown.
Hopefully, we'll get lots of lovely home grown potatoes to give us plenty of room to experiment with potato recipies. It's got me thinking already, there's so much stuff you can do with a spud, salads, chips/wedges, jackets, skins, stuffed, all sorts really. Suggestions welcome of course, but maybe nearer the time!
Wednesday, 16 January 2008
Mushroom risotto
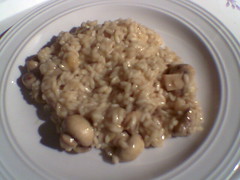
Dinner for one:
Lightly fry a portion of mushrooms with some butter
Add the rice (75g per person) for a minute,
then add 1/2 glass of white wine
When that is gone, slowly add 1/2 pint of vegetable stock (over 15 mins).
Grate in some Parmesan cheese
Serve, Yum
Tuesday, 15 January 2008
Cake

Chocolate cake, chocolate middle and chocolate top with chocolate buttons
Graham's birthday cake
Sunshine food #2
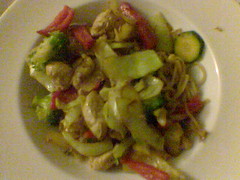
My first attempt at Hanan's stir fry
Chicken, peppers, cabbage, courgette, soy sauce and noddles
Thursday, 3 January 2008
Hanan's Favourite Stir Fry

With thanks to Hanan's idea for her stir fry I made this tasty little number for dinner last night. The picture is only taken with my camera phone though.
I modified Hanan's cooking method (to reduce washing up, I'm lazy like that) and guessed at the quantity of ingredients since no measures were given in the original recipe. However, I quite like that, you can make it to your own taste so take my measures below with a pinch of salt.
Ingredients: (serves 2)
Diced Chicken
2 Sliced Leeks
1 Chopped Red pepper
2 slices of White Cabbage
2 cloves of garlic, chopped
Mixed herbs, salt+pepper to taste
1 tbsp ish Dark soy sauce
Small handful of Pine nuts
Around 6-8 oz rice
Method:
Heat some olive oil in a large pan. Add the garlic, leek and red pepper, frying for a minute or two to soften. Add in the chicken, cabbage, herbs, salt and pepper and fry until the chicken is cooked through. Just before the chicken is thoroughly cooked add the soy sauce and pine nuts.
Serve with boiled basmati rice and enjoy!
Wednesday, 2 January 2008
Christmas Dinner

So it's been a while since either of us have posted anything for which there are many reasons. Mainly, we've just moved house and have been really quite busy with that rather than growing and cooking stuff. But also, it's winter season and there isn't a great deal going on, or to be done, at the allotment at this time of year.
This isn't exactly the finished article of Christmas dinner by a long shot, but I wanted to show off the first sweed we picked. In the confusion surrounding dishing up, and hoards of hungry people hanging around I didn't get time to photograph the finished meal anyway. We grew the carrots too, but the sweed was very nice!
Subscribe to:
Posts (Atom)